Scanning
Scan To BOKUdrive
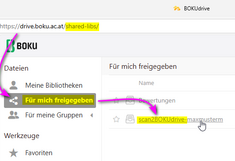
The scan file is stored on BOKUdrive in the library "scan2BOKUdrive-Login-Name" which is shared for you. You can find this library e.g. in the web interface under the following link:
Alternative ways to access BOKUdrive can be found at: https://short.boku.ac.at/it-bokudrive
Scan To Home
With this profile your scanned result is copied into your Novell home folder. Prior to scanning, make sure that you have enough storage space! Your personal Novell home folder can be found here:
\\serverhome\datahome\home\
More related information can be found under Network Drives (Information only in German).
By default the resolution is the same as for "Scan To E-Mail". However, you can alter the resolution in this profile.
Here you can find the options to choose from
Scan To E-Mail
With this profile your scanned result is sent to your standard email address. Since there is a very restricted amount of data you can actually send via email, resolution in this mode is not very high and cannot be altered.
BOKU learn Offline-Test
This profile basically equates to the previously described profile "Scan To Home".
The difference is in the pre-settings which are especially coordinated for the BOKUlearn service "Offline-Test". It is defined in the following way:
- resolution: 200dpi
- color: gray shades
- scanning only one page per sheet
- producing an individual file for every page
- file format: jpeg
- predefined file name: Offline-Test_<Datum>_<Zeit>_#
Approach
- select "BOKU learn Offline-Test"
- place the pile of filled tests in the automatic feeder (printed side on top)
- press the scan button
- and off you go ...
For each scanned page an individual file with the above mentioned name is generated in your home folder. The sign # is replaced by a consecutive number.
Alternative options for scanning
Alternative options for scanning are compiled on the following page:

